This article will detail the steps needed to query a SnowflakeDB directly from an Oracle database.
The end result will be the ability and knowledge to query Snowflake data directly as below example.
Concepts
You can skip the Concepts section if you don’t really care what is happening behind the scenes and jump straight to the implementation section to setup a connection between Oracle and Snowflake.
Open Database Connectivity (ODBC)
ODBC provides a standard interface to access a database, it was created by Microsoft and ‘Simba’ Technologies, (interestingly the name ‘simba’ is referenced in the Snowflake driver configuration file which we’ll see later)
ODBC was created to be independent from the database and its o/s, this independence is achieved using a ‘driver’ to translate the data between two components. These components could be an application or a Database, if that application is another Database then this allows two Databasess to communicate with each other.
SnowflakeDB provide a freely available ODBC driver, but there are commercial versions also available from vendors such as CDATA and Progressive. For the purpose of the blog we will use the freely available SnowFlake ODBC driver.
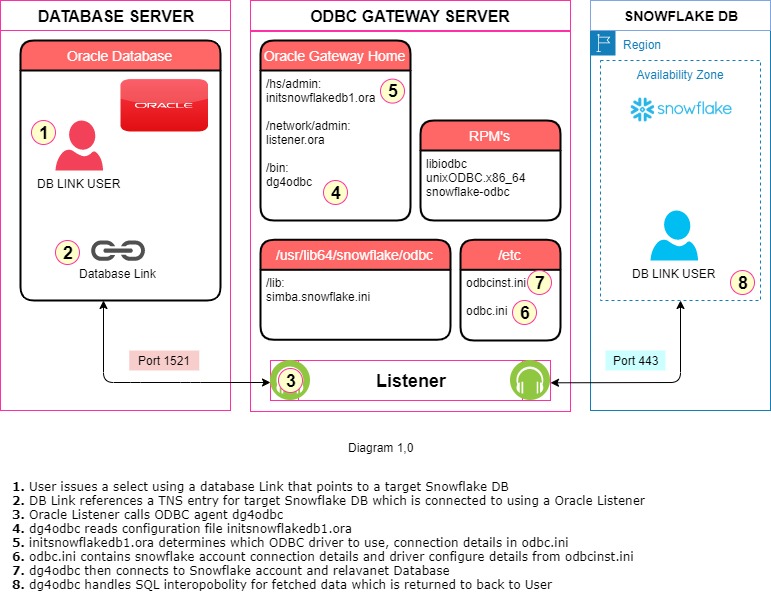
Oracle ODBC Gateway Overview
Oracle Gateways allow us to connect an Oracle database with non-Oracle systems such as Snowflake Data Warehouse.
The Gateway handles the communication between these two separate systems. Oracle provides specific gateways for many database vendors such as DB2, Sybase and SQL Server,
For a generic non database Specific gateway it can use an ODBC driver to access any ODBC compatible database. As there is no specific gateway for SnowFlake DB, we have to use the ODBC gateway to connect Oracle to SnowFlake.
The actual gateway can run on the same server with the Oracle Database or can run on its own server. Running the Gateway on its own server has several benefits including:
- We don’t need to touch DB server to implement solution
- All server level changes and configuration performed on Gateway Server
- For locked down environments where there is no access to the DB server we can still setup a gateway this could include AWS Oracle RDS or a highly secured on premise datrbase server.
- Opens door to Platforms where Snowflake ODBC driver is not available like Solaris
*setup has been tested against an onprem database and AWS RDS Oracle.
Oracle Gateway components
The Oracle Gateway is made up of two main components detailed below:
a) Heterogeneous Services (HS): generic capability to connect to a non Oracle target
– Allows Oracle to accept and understand SQL from the remote db system
– Understand the remote databases Data Dictionary
– Handles the transaction co-ordination between oracle and remote db system.
b) Agent: target specific process
– For ODBC the oracle agent process/program is called dg4odbc
– SQL Mappings
– Data Type conversion
– Interface to remote non oracle system
– interacts with HS for transparent connectivity
This document will detail the 3 tier architecture (oracle server, gateway server, snowflake server), use of a separate gateway server is not always needed (it is for AWS Oracle RDS), though it is easily adaptable to a 2 tier setup with the same configuration being performed on the database server rather than a dedicated Gateway Server.
Database Link
A database link normally allows two Oracle Databases to talk to each other, the use of Oracle Gateways extends this functionality to allow an Oracle database to talk to a non-Oracle target using the same syntax in creation and subsequent querying. The database identifier will be listened for by the gateway listener and invoke the Gateway agent process called dg4odbc.
Implementation
Steps will cover the commands and process needed to setup a Snowflake ODBC connection from Oracle.
Networking
It’s worthwhile noting which ports components will be communicating on this will help if there are networking issues and setting up rules needed for AWS security Groups/Firewalls.
| Component | Inbound Port |
| Database Listener | 1521 |
| Gateway Listener | 1521 |
| Snowflake DB | 443 |
The Oracle Database can be RAC or Single Instance it does not matter as we do not connect to DB/Grid Listener, we only connect to the Gateway Listener which will be running on a dedicated server.
If using AWS to test for this, I setup 2 Security Groups one for Database inbound on port 1521 where source is EC2 Instance Security Group and other for Gateway Listener on port 1521 where source is Database Security Group.
O/S Oracle Gateway Server Setup
(Tested on RHEL 7 only this could be an on premise server or AWS EC2)
In many ways this is similar to preparing a server for installation of the Oracle RDBMS s/w, but we’ll keep it to a minimum for this demonstration.
1. Create an Oracle user and Group As root:
groupadd -g 54321 oinstall
groupadd -g 54322 dba
useradd -u 54321 -g oinstall -G dba oracle

passwd oracle # specify a password when prompted
2. Create a Parent s/w dir or mount point owned by oracle:oinstall as root:
mkdir /u01
chown oracle:oinstall /u01
- Install pre-requisite RPM’s
The easiest way to install the pre-requisite rpms is to use Oracle provided oracle-database-preinstall-19c-1.0-1.el7.x86_64.rpm as below:
- Setup Access to RHEL repo and rpm’s
(You will need to register for a free RHEL education/learner account to download rpm from their repo)
subscription-manager register
subscription-manager refresh
subscription-manager attach --auto
yum-config-manager --enable rhel-7-server-optional-rpms
- Download and install : oracle-database-preinstall-19c-1.0-1.el7.x86_64.rpm
curl -o oracle-database-preinstall-19c-1.0-1.el7.x86_64.rpm https://yum.oracle.com/repo/OracleLinux/OL7/latest/x86_64/getPackage/oracle-database-preinstall-19c-1.0-1.el7.x86_64.rpm
yum -y localinstall oracle-database-preinstall-19c-1.0-1.el7.x86_64.rpm
Install Oracle Gateway Server
- Download Gateway s/w
https://www.oracle.com/database/technologies/oracle19c-linux-downloads.html
For Linux x86 we would download: LINUX.X64_193000_gateways.zip, Space required approximately 1 GB
Review Prerequisite for ODBC, though any issues should be flagged by installer.
https://docs.oracle.com/en/database/oracle/oracle-database/19/otgis/part-odbc-gateway.html
*tested 19c Gateway against both 12c and 19c databases and both worked.
- Copy Gateway s/w to target Gateway server
scp or sftp s/w to target server
unzip into a staging area, requires 1.5 GB
unzip -d 19C_GATEWAY LINUX.X64_193000_gateways.zip
- Silent Install the Gateway s/w as user ‘oracle’
Save below to a response file called /var/tmp/odbc_gateway.rsp to be used for install:
Update ORACLE_HOME location and ORACLE_BASE to a different location if needed
Space required for install is 2Gb
/var/tmp/odbc_gateway.rsp:
oracle.install.responseFileVersion=/oracle/install/rspfmt_tginstall_response_schema_v19.0.0
UNIX_GROUP_NAME=oinstall
INVENTORY_LOCATION=/u01/app/oraInventory
ORACLE_HOME=/u01/app/oracle/product/19.0.0/tghome_1
ORACLE_BASE=/u01/app/oracle
oracle.install.tg.customComponents=oracle.rdbms.hsodbc:19.0.0.0.0
oracle.install.tg.ifmxConStr=
oracle.install.tg.msqlConStr=
oracle.install.tg.sybsConStr=
oracle.install.tg.teraConStr==
oracle.install.tg.db2ConStr=
oracle.install.tg.appc.protocol=SNA
oracle.install.tg.wbsp.remote.str=
oracle.install.tg.wbsp.location=
oracle.install.tg.wbsp.local.queuemgr=
cd <gateway s/w>/gateways
./runInstaller -responseFile /var/tmp/odbc_gateway.rsp -silent
*If any warnings are reported, you will be notified of the log file to check.
*The Gateway Oracle Home should be part of any patching schedule undertaken.
- Run root.sh as user ‘root’ accept any defaults
Run: /u01/app/oracle/product/19.0.0/tghome_1/root.sh- Add an oratab to allow us to set environment later on
vi /etc/oratab
Add:
GATEWAY:/u01/app/oracle/product/19.0.0/tghome_1:NConfigure Oracle Gateway Server
1. Set environment
. oraenv <<< GATEWAY
cd $ORACLE_HOME/network/admin
pwd
# Path should now be /u01/app/oracle/product/19.0.0/tghome_1/network/admin
2. Update listener.ora file
The listener.ora file contains the configuration details that tell the connection string the name of the gateway agent to use, the gateway software location and Unix port to run on.
vi listener.ora: Complete file should now look like: Update the hostname, this hostname must be resolvable by Oracle RDS host and resolve to the Gateway Server.
LISTENER =
  (DESCRIPTION_LIST =
    (DESCRIPTION =
      (ADDRESS = (PROTOCOL = TCP)(HOST = <hostname> )(PORT = 1521))
      (ADDRESS = (PROTOCOL = IPC)(KEY = EXTPROC1521))
    )
  )

SID_LIST_LISTENER =
  (SID_LIST =
        (SID_DESC = (SID_NAME = snowflakedb1) (ORACLE_HOME = /u01/app/oracle/product/19.0.0/tghome_1) (PROGRAM = dg4odbc))
  )
3. Bounce Listener as follows:
lsnrctl stop
lsnrctl start
4. Enable auto restart of listener with Server
If the Unix server was to restart we need the listener to stop and start with the server, this can be accomplished as below:
a. Create a script to stop and start Linux, takes start or stop as an argument
Create below file: /usr/local/bin/gateway_listener_stop_start.sh as user ‘root’
chmod 755 /usr/local/bin/gateway_listener_stop_start.sh
#!/bin/bash

#name : /usr/local/bin/gateway_listener_stop_start.sh
#V1.0
#PSAMMY

export PATH=/usr/local/bin:/usr/local/sbin:/usr/bin:/usr/sbin:/bin:/sbin:/home/oracle/.local/bin:/home/oracle/bin:/u01/app/oracle/product/19.0.0/tghome_1/bin
export ORACLE_HOME=/u01/app/oracle/product/19.0.0/tghome_1

case $1 in

start)
echo “STARTING LISTENER”
ps -ef|grep "tns"|grep LISTENER|grep -v grep

if [ $? -eq 0 ]
then
echo “LISTENER is already running”
exit 1;
fi

lsnrctl start
;;

stop)
ps -ef|grep "tns"|grep LISTENER|grep -v grep

if [ $? -gt 0 ]
then
echo “LISTENER is not running”
exit 1;
fi


lsnrctl stop
;;

*)
echo “only start or stop can be used as arguments”
exit 1
;;

esac
b. Create a service to call this script and enable the service so LISTENER auto starts and stops:
As ‘root’ Create file:
vi /usr/lib/systemd/system/gateway_listener.service
[Unit]
Description=Gateway Listener for Oracle
After=network.target

[Service]
RemainAfterExit=yes
User=oracle
Type=simple
ExecStart=/bin/bash /usr/local/bin/gateway_listener_stop_start.sh start
ExecStop=/bin/bash /usr/local/bin/gateway_listener_stop_start.sh stop

[Install]
WantedBy=multi-user.target
c. Reload systemd service files
As root:
systemctl daemon-reload
systemctl disable gateway_listener
systemctl enable gateway_listener
systemctl stop gateway_listener
systemctl start gateway_listener
d. perform a reboot of gateway server to check listener restarts with server
As root:
reboot nowe. Check listener is now running as oracle user:
ps -ef|grep tns|grep LISTENERoracle 11013 1 0 17:30 ? 00:00:00 /u01/app/oracle/product/19.0.0/tghome_1/bin/tnslsnr LISTENER -inherit
Install and configure Snowflake ODBC driver with Oracle Gateway
- Install pre-requisite rpm’s as root
(https://docs.snowflake.com/en/user-guide/odbc-linux.html#prerequisites)
yum install libiodbc -y
yum search unixODBC -y
yum install unixODBC.x86_64 -y
- Confirm odbc installation
odbcinst is a command line tool created to create/remove entries in odbc.ini and odbcinst.ini. This command line tool is a complement to the shared library of the same name (libodbcinst.so). This tool is a part of the odbcinst component of unixODBC.
odbcinst -j
Output:
odbcinst -j
unixODBC 2.3.1
DRIVERS............: /etc/odbcinst.ini
SYSTEM DATA SOURCES: /etc/odbc.ini
FILE DATA SOURCES..: /etc/ODBCDataSources
USER DATA SOURCES..: /home/oracle/.odbc.ini
SQLULEN Size.......: 8
SQLLEN Size........: 8
SQLSETPOSIROW Size.: 8
- Install Snowflake vendor ODBC driver
To install the snowflake driver we will add its repository so that when we run yum install command the o/s know where and how to download it.
As root:
vi /etc/yum.repos.d/snowflake-odbc.repo
[snowflake-odbc]
name=snowflake-odbc
baseurl=https://sfc-repo.snowflakecomputing.com/odbc/linux/2.22.1/
gpgkey=https://sfc-repo.snowflakecomputing.com/odbc/Snowkey-37C7086698CB005C-gpg
run as root:
yum install snowflake-odbc- Configure Snowflake driver
simba.snowflake.ini File is the Driver Manager and Logging configuration file
Configuring the ODBC driver requires adding entries to the following files:
cd /usr/lib64/snowflake/odbc/libReview ‘simba.snowflake.ini’ should contain below and no changes needed.
[Driver]
DriverManagerEncoding=UTF-16
DriverLocale=en-US
ErrorMessagesPath=/usr/lib64/snowflake/odbc/ErrorMessages
LogNamespace=
LogPath=/tmp
ODBCInstLib=libodbcinst.so
CURLVerboseMode=false
#LogLevel=6
CABundleFile=/usr/lib64/snowflake/odbc/lib/cacert.pem
- Configure /etc/odbcinst.ini File (Driver Registration)
odbcinst.ini holds the configuration for the Driver section in odbc.ini
Add the following entries to the odbcinst.ini file, expect [SnowflakeDSIIDriver] to already exist:
vi /etc/odbcinst.ini
[ODBC Drivers]
SnowflakeDSIIDriver=Installed

[SnowflakeDSIIDriver]
APILevel=1
ConnectFunctions=YYY
Description=Snowflake DSII
Driver=/usr/lib64/snowflake/odbc/lib/libSnowflake.so
DriverODBCVer=03.52
SQLLevel=1
UsageCount=1
- Configure odbc.ini File
(https://docs.snowflake.com/en/user-guide/odbc-parameters.html#setting-parameters-in-macos-or-linux)
For each Data Source Name (DSN), we provide configuration information for that DSN contained in odbc.ini.
Add the following entries to the odbc.ini file, to identify the server and account we will be connecting to and using which ODBC driver:
vi /etc/odbc.ini, under [snowflakeodbc1], update your account and server logon details.
[ODBC Data Sources]
snowflakeodbc1 = SnowflakeDSIIDriver

[snowflake]
Description=SnowflakeDB
Driver=SnowflakeDSIIDriver
Locale=en-US
SERVER=SF_ACCOUNT.snowflakecomputing.com
PORT=443
SSL=on
ACCOUNT=SF_ACCOUNT

[snowflakeodbc1]
Driver      = /usr/lib64/snowflake/odbc/lib/libSnowflake.so
Description =
server      = ab12345.eu-west-2.aws.snowflakecomputing.com
account     = ab12345
LogLevel    = 0
LogPath     = /var/tmp
- Test ODBC Driver
odbcinst -q -d
output:
[ODBC Drivers]
[SnowflakeDSIIDriver]
We can also test a real connection to Snowflake at this point using ODBC driver and isql as below:
isql -v snowflakeodbc1 <ACCOUNT> <PASSWORD>
SQL> select current_timestamp();
+------------------------------+
| CURRENT_TIMESTAMP()          |
+------------------------------+
| 2021-10-25 10:31:13.560000000|
+------------------------------+

SQLRowCount returns 1
1 rows fetched
quit
Setup Oracle Gateway configuration
1. Setup environment variables using oraenv:
. oraenv <<< GATEWAY
cd $ORACLE_HOME/hs/admin
pwd
Output:
/u01/app/oracle/product/19.0.0/tghome_1/hs/admin
2. Create Gateway initialisation file
The gateway initialisation file will let Oracle know the ODBC driver and attributes as defined in odbc.ini alias for the same. We can also control many attributes for the gateway in this file.
For the full set of settings see: https://docs.oracle.com/database/121/OTGIW/apd.htm#OTGIW1135
Create initsnowflakedb1.ora, with below details:
HS_FDS_CONNECT_INFO = " snowflakeodbc1"
HS_FDS_TRACE_LEVEL = OFF
HS_FDS_SHAREABLE_NAME = /usr/lib64/snowflake/odbc/lib/libSnowflake.so
HS_LANGUAGE=AMERICAN_AMERICA.WE8ISO8859P1
set ODBCINI=/etc/odbc.ini
Error Ora-28500 and Sqlstate I or Displays a Square Bracket – [ – Issuing Selects From a Unicode Oracle RDBMS With Dg4odbc To Non-Oracle Databases Using the UnixODBC Driver Manager (Doc ID 756186.1) where fix is: HS_LANGUAGE=AMERICAN_AMERICA.WE8ISO8859P1
Setup a Snowflake Account and supporting components to service odbc gateway link
We will create a dedicated Snowflake user, warehouse and role to facilitate Oracle to Snowflake queries, this will allow us to control what the user can access and the resources it may consume.
- Create Warehouse
CREATE WAREHOUSE ORA_TO_SF_WH1 WITH
WAREHOUSE_SIZE = 'XSMALL'
WAREHOUSE_TYPE = 'STANDARD'
AUTO_SUSPEND = 300
AUTO_RESUME = TRUE
MIN_CLUSTER_COUNT = 1
MAX_CLUSTER_COUNT = 1
SCALING_POLICY = 'STANDARD'
COMMENT = 'Warehouse to handle oracle to snowflake queries';
- Create New Account
Update details as needed for instance DEFAULT_NAMESPACE to that of database we want oracle to query in Snowflake.
CREATE USER ORA_TO_SF_USER1
  PASSWORD = 'Test1234'
  DEFAULT_WAREHOUSE = ORA_TO_SF_WH1
  DEFAULT_NAMESPACE = DEMO_DB
  DEFAULT_ROLE = ORA_TO_SF_ROLE1
  DEFAULT_SECONDARY_ROLES = ( 'ALL' )
  COMMENT = 'User for ODBC connection from Oracle to Snowflake'
- Create Role and Grants
GRANT ROLE ORA_TO_SF_ROLE1 TO USER ORA_TO_SF_USER1;
GRANT USAGE ON WAREHOUSE ORA_TO_SF_WH1 TO ORA_TO_SF_ROLE1;
CREATE ROLE ORA_TO_SF_ROLE1;
- Grant necessary roles and grants to the new role:
GRANT ..... TO ORA_TO_SF_ROLE1;Setup Oracle Database link
We will provide the tns details in line with the database link creation, that way we avoid having to update or maintain a tnsnames.ora file
Note the ‘HS=OK’ syntax ensures that the connection uses the Oracle Heterogeneous Service.
*Update Gateway server host below
CREATE DATABASE LINK snowflakedb1
CONNECT TO ORA_TO_SF_USER1 IDENTIFIED BY Test1234
USING '(DESCRIPTION= (ADDRESS=(PROTOCOL=tcp)(HOST=<Gateway server host>)(PORT=1521)) (CONNECT_DATA=(SID=snowflakedb1)) (HS=OK))';
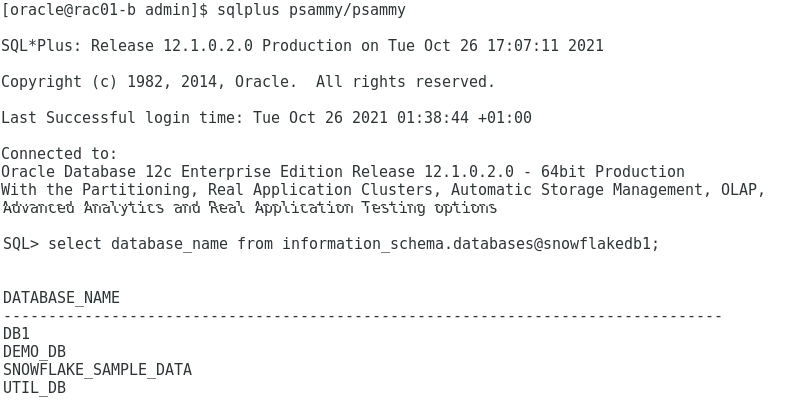
select database_name from information_schema.databases@snowflakedb1;

DATABASE_NAME
--------------------------------------------------------------------------------
DEMO_DB
SNOWFLAKE_SAMPLE_DATA
UTIL_DB
At this point we now have a working setup and this completes the implementation steps.
Appendix A Licencing Considerations
Database Gateway and Generic Connectivity (DG4ODBC) Licensing Considerations (Doc ID 232482.1)
“The Oracle Database Gateway for ODBC (DG4ODBC) is included in your Oracle Database Server license without extra cost. If DG4ODBC is installed on a different machine from where the Oracle Database Server is installed then it is still covered by the Oracle Database Server license and that install of DG4ODBC does not need a separate license.
While the Database Gateway for ODBC (DG4ODBC) does not require an additional license from Oracle, a third party ODBC driver is required, which may require a purchase independent of Oracle.”
Also review:
References
Options for Connecting to Foreign Data Stores and Non-Oracle Databases – For Example – DB2, SQL*Server, Sybase, Informix, Teradata, MySQL (Doc ID 233876.1)
https://en.wikipedia.org/wiki/Open_Database_Connectivity
https://www.oracle.com/technetwork/database/gateways/gateways-fov-133149.pdf
Installing and Configuring the ODBC Driver for Linux — Snowflake Documentation
ORACLE-BASE – Oracle Database 19c RPM Installation On Oracle Linux 7 (OL7) and Oracle Linux 8 (OL8)