After completing PART1 we should have an Oracle XE 18C database up and running called XE with a pluggable application database called XEPDB1.
This article will cover the steps needed to set up and install Oracle Apex 18.2 to use this database.

First we need to download the APEX 18.2 deployment and Oracle REST Data Services (ORDS) 18.3 code from the Oracle website.
Note Oracle ORDS will be the web server/listener (Jetty webserver running in standalone mode).
Log on to website: https://www.oracle.com/technetwork/developer-tools/apex/downloads/index.html
Download:
Oracle APEX 18.2 – English language only Download
[MD5 Checksum: 6120def2c0ff8f3c04ec55c22ba1bd81]
Save file to a known location using ‘save as’ option, I’m using:
D:\ORACLE18c_SW
Download Oracle REST data services (ORD):
https://www.oracle.com/technetwork/developer-tools/rest-data-services/downloads/index.html

Save file to a known location using ‘save as’ option, I’m using:
D:\ORACLE18c_SW
The Apex installation can either be:
Full Development, where we have access to a development environment
Runtime, where we can only deploy Apex applications
For this article it’s assumed we will install the Full Development environment so we can do some Apex coding and development, but it’s possible to switch between the 2 later if needed (not covered)
The main Apex schema uses a release specific naming convention, for Apex 18.2 the main schema will be APEX_180200
There are 3 types of user in Apex we should be aware of:
| Instance administrators | Super users that manage instance using a separate application called Oracle Application Express Administration Services |
| Workspace administrators | Perform administrator tasks specific to a workspace |
| Developers | Sign in to a workspace and create application |
| End users | Can only run existing applications |
su -


mkdir /opt/oracle/APEX

chown oracle:oinstall /opt/oracle/APEX


cd /opt/oracle/APEX

cp /media/sf_ORACLE18c_SW/apex_18.2_en.zip .


chown oracle:oinstall apex_18.2_en.zip
- Unzip the Apex 18.2 installation files as oracle
As oracle user unzip the installation files
exit #to become oracle user again


cd /opt/oracle/APEX

unzip -d apex_18.2_en apex_18.2_en.zip

cd apex_18.2_en/apex
3. Install the Apex 18.2 schema into pluggable database XEPDB1 as oracle
cd /opt/oracle/APEX/apex_18.2_en/apex

. oraenv <<< XE


sqlplus SYS/oracle123 as SYSDBA


ALTER SESSION SET CONTAINER = XEPDB1;

show con_name

show user
We expect output of above to be XEPDB1 and SYS, we’ll create a new tablespace APEX_DATA and then run the installation using below command in sqlplus:
CREATE TABLESPACE APEX_DATA

datafile '/opt/oracle/oradata/XE/XEPDB1/apex_data01.dbf' SIZE 1G

EXTENT MANAGEMENT LOCAL AUTOALLOCATE SEGMENT SPACE MANAGEMENT AUTO;


@apexins.sql APEX_DATA APEX_DATA TEMP /i/
[Time for tea break will take 30 minutes to deploy]
Just for information the syntax of the above install command is as follows:
Arg2: tablespace_files is the name of the TS for the APEX files user.
Arg3: tablespace_temp is the name of the TEMP TS.
Arg4: images is the virtual directory for APEX images. define the virtual image directory as /i/.
Script will spool to a log in the same directory which we can grep after for errors, at the end of installation we will see:
Thank you for installing Oracle Application Express 18.2.0.00.12
The installation script creates below 3 schemas:
| APEX_180200 | Application Express schema and metadata |
| FLOWS_FILES | Application Express uploaded files |
| APEX_PUBLIC_USER | For Application Express configuration with Oracle REST Data Services or Oracle HTTP Server and mod_plsql |
Installing Application Express and Configuring Oracle REST Data Services
Creating Instance Administration Account
As oracle user run the below in pluggable PDB XEPDB1:
You will be prompted for username                           : accept default of ‘ADMIN’


You will be prompted to enter a password for the admin user : Oracle123!

You will be prompted for an email address                   : oracle@centora1.localdomain
cd /opt/oracle/APEX/apex_18.2_en/apex
. oraenv <<< XE
sqlplus SYS/oracle123@XEPDB1 as SYSDBA
@apxchpwd.sql
...set_appun.sql
================================================================================
This script can be used to change the password of an Application Express
instance administrator. If the user does not yet exist, a user record will be
created.
================================================================================
Enter the administrator's username [ADMIN]
User "ADMIN" does not yet exist and will be created.
Enter ADMIN's email [ADMIN] oracle@centora1.localdomain
Enter ADMIN's password []Oracle123!
Created instance administrator ADMIN.Configure the APEX_PUBLIC_USER
The APEX_PUBLIC_USER account is created with a random password in a new installation of Oracle Application Express and also locked
cd /opt/oracle/APEX/apex_18.2_en/apex


. oraenv <<< XE

sqlplus SYS/oracle123@XEPDB1 as SYSDBA

ALTER USER APEX_PUBLIC_USER ACCOUNT UNLOCK;

ALTER USER APEX_PUBLIC_USER IDENTIFIED BY oracle123;
Create a new profile to assign APEX_PUBLIC_USER account so it does not expire after 180 days as per default:
create profile APEX_USER_PROFILE limit PASSWORD_LIFE_TIME UNLIMITED;

alter user APEX_PUBLIC_USER profile APEX_USER_PROFILE;
Installing ORDS
Copy the ORDS software and unzip
Copy the REST Data Services install zip to our Virtual Machine:
As root user:
su -
cd /opt/oracle/APEX

cp /media/sf_ORACLE18c_SW/ords-18.3.0.270.1456.zip .

chown oracle:oinstall ords-18.3.0.270.1456.zip
As oracle user copy images directory from APEX install tree to ords install tree:
cd /opt/oracle/APEX

unzip -d ords-18.3.0.270.1456 ords-18.3.0.270.1456.zip

cp -R /opt/oracle/APEX/apex_18.2_en/apex/images /opt/oracle/APEX/ords-18.3.0.270.1456
Install ORDS into our PDB and start
This step creates 2 additional users are created for REST
| APEX_REST_PUBLIC_USER | Used when invoking RESTful Services definitions stored in APEX |
| APEX_LISTENER | Used to query RESTful Services definitions stored in |
Create a tablespace for ORDS:
. oraenv <<< XE

sqlplus SYS/oracle123@XEPDB1 as SYSDBA

CREATE TABLESPACE ORDS_DATA

datafile '/opt/oracle/oradata/XE/XEPDB1/ords_data01.dbf' SIZE 1G

EXTENT MANAGEMENT LOCAL AUTOALLOCATE SEGMENT SPACE MANAGEMENT AUTO;
During the install process you will be prompted for several questions answer these as below
Install ORDS:
Enter the location to store configuration data   : /opt/oracle/APEX

Enter the name of the database server            : centora1
Enter the database listen port [1521]            : accept default
Enter 1 to specify the database service name     : 1
Enter the database service name                  : XEPDB1
Enter 1 if you want to verify/install Oracle REST Data Services schema  : 1
Enter the database password for ORDS_PUBLIC_USER                        : oracle123
Enter the database password for SYS AS SYSDBA                           : oracle123
Enter the default tablespace for ORDS_METADATA [SYSAUX]                 : ORDS_DATA
Enter the temporary tablespace for ORDS_METADATA [TEMP]                 : accept default
Enter the default tablespace for ORDS_PUBLIC_USER [SYSAUX]              : ORDS_DATA
Enter the temporary tablespace for ORDS_PUBLIC_USER [TEMP]              : accept default
If using Oracle Application Express or migrating from mod_plsql         : 1
Enter the PL/SQL Gateway database user name [APEX_PUBLIC_USER]          : accept default
Enter the database password for APEX_PUBLIC_USER                        : oracle123
Enter 1 to specify passwords for APEX RESTful Services database users   : 1
Enter the database password for APEX_LISTENER                           : oracle123
Enter the database password for APEX_REST_PUBLIC_USER                   : oracle123
Choose to start in standalone mode when asked, note the images directory we copied earlier
Enter 1 if you wish to start in standalone mode or 2 to exit [1]  : 1
Enter the APEX static resources location: /opt/oracle/APEX/ords-18.3.0.270.1456/images
Enter 1 if using HTTP or 2 if using HTTPS [1]   : accept default
Enter the HTTP port [8080]                      : accept default
To begin the install:
cd /opt/oracle/APEX/ords-18.3.0.270.1456
java -jar ords.war install advanced
You will need to answer questions as advised above, once this step is done the ORDS Jetty Web server will be running in for foreground and have focus on the terminal similar to below:
INFO: Oracle REST Data Services initialized

Oracle REST Data Services version : 18.3.0.r2701456

Oracle REST Data Services server info: jetty/9.4.z-SNAPSHOT

2018-10-25 11:25:39.621:INFO:oejsh.ContextHandler:main: Started o.e.j.s.ServletContextHandler@2357d90a{/ords,null,AVAILABLE}

2018-10-25 11:25:39.622:INFO:oejsh.ContextHandler:main: Started o.e.j.s.h.ContextHandler@6328d34a{/i,null,AVAILABLE}

2018-10-25 11:25:39.663:INFO:oejs.AbstractConnector:main: Started ServerConnector@4df50bcc{HTTP/1.1,[http/1.1, h2c]}{0.0.0.0:8080}


2018-10-25 11:25:39.663:INFO:oejs.Server:main: Started @542133ms
Stop ORDS Webserver
To stop the ORDS Jetty Webserver, it’s a simple ‘CTRL C’, let’s do that we will restart it again in the background.Type: CNTRL C together
Now ORDS is stopped and we have out prompt back.
Start ORDS Webserver
We can start ORDS manually with:
cd /opt/oracle/APEX/ords-18.3.0.270.1456


java -jar ords.war standalone
But again this will take control of our session and run in the foreground.
We’ll create a service and script to start and stop ORDS with our Virtual Machine as below:
First create the script with below code as user oracle: /opt/oracle/APEX/ords_stop_start.
#!/bin/bash

#P SAMMY

#Script to stop and start ORDS, takes start or stop as an argument
#name : ords_stop_start.sh
#V1.0

#Set ENV

export PATH=/usr/local/bin:/usr/local/sbin:/usr/bin:/usr/sbin:/bin:/sbin:/home/oracle/.local/bin:/home/oracle/bin:/opt/oracle/product/18c/dbhomeXE/bin


export ORDS_HOME=/opt/oracle/APEX/ords-18.3.0.270.1456


#Process start and stop parameters
case $1 in

start)

echo "STARTING ORDS"


ORD_PID=ps -ef|grep "ords.war standalone"|grep APEX|grep -v grep|awk '{print $2}'

ps -ef|grep "ords.war standalone"|grep APEX|grep -v grep


if [ $? -eq 0 ]
then
        echo "ORDS is already running"
exit 1;

fi

rm -f ${ORDS_HOME}/ords_standalone.log
nohup /usr/bin/java -jar ${ORDS_HOME}/ords.war standalone >> ${ORDS_HOME}/ords_standalone.log 2>&1 &

;;


stop)

ORD_PID=ps -ef|grep "ords.war standalone"|grep APEX|grep -v grep|awk '{print $2}'

ps -ef|grep "ords.war standalone"|grep APEX|grep -v grep

if [ $? -gt 0 ]
then
echo "ORDS is not running"
exit 1;
fi

echo "Killing PID ${ORD_PID}"
kill -15 ${ORD_PID}

sleep 5

ps -ef|grep "ords.war standalone"|grep APEX|grep -v grep
;;


*)
echo "only start or stop can be used as arguments"

exit 1

;;

esac
make this script executable:
chmod u+x ords_stop_start.shCreate a service as user root to start ORDS
Next create a service to call this script and enable the service so ORDS auto starts and stops with the virtual machine:
Create file : /usr/lib/systemd/system/ords_apex.service containing below as root user:
[Unit]
Description=ORDS Jetty WEB Server for APEX

After=network.target


[Service]

User=oracle

Type=forking

ExecStart=/opt/oracle/APEX/ords_stop_start.sh start
ExecStop=/opt/oracle/APEX/ords_stop_start.sh stop

[Install]

WantedBy=multi-user.target
Reload systemd service files as root:
systemctl enable ords_apex


systemctl start ords_apex
Configuring RESTful Services, will be requested to enter passwords for new users
As user oracle: APEX_LISTENER and APEX_REST_PUBLIC_USER, enter oracle123 for both
- Enter a password for the APEX_LISTENER user : oracle123
- Enter a password for the APEX_REST_PUBLIC_USER user : oracle123
cd /opt/oracle/APEX/apex_18.2_en/apex


. oraenv <<< XE
sqlplus SYS/oracle123@XEPDB1 as SYSDBA
@apex_rest_config.sql

exit
Grant connect privileges to host for the APEX_180200 database user
. oraenv <<< XE


sqlplus SYS/oracle123@XEPDB1 as SYSDBA


BEGIN
DBMS_NETWORK_ACL_ADMIN.APPEND_HOST_ACE(

host => 'localhost',

ace => xs$ace_type(privilege_list => xs$name_list('connect'),

principal_name => 'APEX_180200',

principal_type => xs_acl.ptype_db));

END;

/


exit;
Creating a Workspace Manually
Use FireFox web browser :Applications -> Internet-> Firefox Web Browser
Enter URL to manage workspace : http://centora1:8080/ords/apex_admin
Username: admin
Password: Oracle123!

Click Manage Workspaces
Click Create Workspace

Enter details below:
Workspace Name                        : APEX_DEV

Workspace ID                          : leave blank

Workspace Description                 : Workspace for Apex Development
Click Next.

Re-use existing schema?              : No

Schema Name                          : APEX_DEV

Schema Password                      : oracle123

Space Quota (MB)                     : accept default of 100MB
Click Next.

Administrator Username               : ADMIN
Administrator Password               : Oracle123!
Email                                : oracle@centora1.localdomain

Note the new Tablespace and datafile are not XXX as shown in summary, but when created are as below:

Creating Oracle Application Express Users
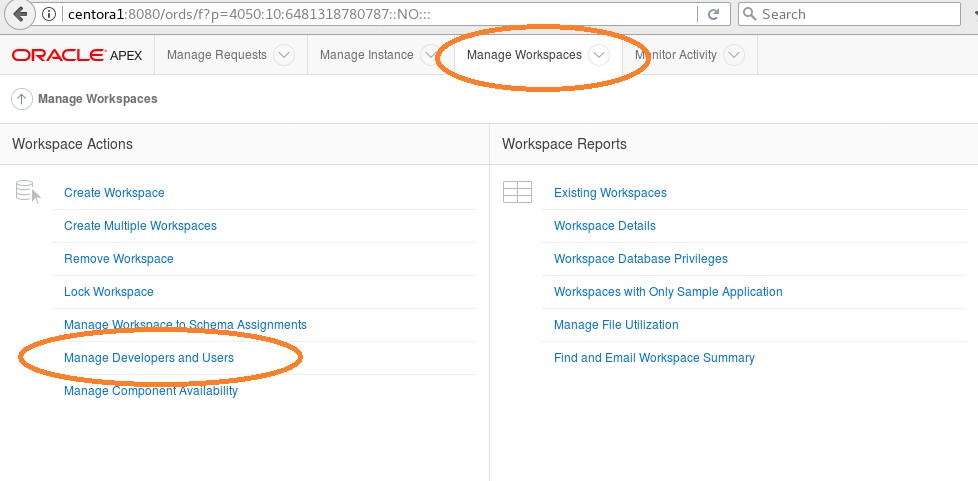
Click the Manage Workspaces icon.
Click Manage Developers and Users.
Click Create User.

Username                           : dev_user1
Email Address                      : oracle@centora1.localdomain
Workspace                          : APEX_DEV
Default Schema                     : APEX_DEV
User is an administrator           : Yes
Password                           : oracle123
Require Change of Password on First Use: No

Signing into a Workspace as Developer
http://centora1:8080/ords
WORKSPACE:     APEX_DEV
USERNAME:       dev_user1
Password:           oracle123

Reboot test
Good point to reboot our virtual machine to see all components restarted ok, as root user
su -
reboot now
Once the system comes back log on in as oracle and check Apex is available:
http://centora1:8080/ords

WORKSPACE:     APEX_DEV
USERNAME:      dev_user1
Password:      oracle123
We can now start developing Apex App’s.