Oracle 19c RDBMS Upgrade using autoupgrade walk through v1.1
Note: These steps should be tested comprehensively and are undertaken at the users own risk
autoupgrade tool is a java based tool designed to automate upgrades of databases following best practice, the previous methods of upgrading still exist, but autoupgrade is fast becoming the recommended way.
autoupgrade supports upgrades from version 11.2.0.4 onwards
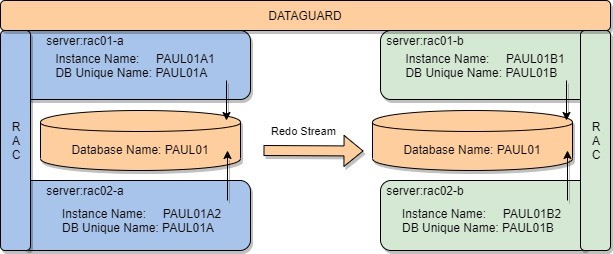
The example detailed will upgrade the aptly name database ‘PAUL01’ from Oracle 12c to 19c which is a 2 node RAC and Dataguard setup as depicted below:
References:
- https://docs.oracle.com/en/database/oracle/oracle-database/19/upgrd/database-upgrade-guide.pdf
- https://mikedietrichde.com/
- https://dohdatabase.com/2020/11/26/how-to-upgrade-with-data-guard/
1. Known Issues
- Review : https://mikedietrichde.com/
2. Pre-requisites
- Grid Infrastructure 19c installed ideally to latest support version/Release Update
- RDBMS 19c s/w installed ideally to latest support version/Release Update
- Install latest version of tfactl/AHF, in case need to raise SR for help
- Know where key logs are and how to collect logs needed for SR
- Ensure application is compatible with 19c and know any required settings in advance
3. Review and apply patches to GI and RDBMS
- Check for any pre-requisite patches on Grid/RDBMS, this note will be updated on a regular basis so recheck
- “Patches to apply before upgrading Oracle GI and DB to 19c (Doc ID 2539751.1)”
4. Download latest version of autoupgrade.jar (1 minute)
- link in note 2485457.1, save download as autoupgrade.jar
- This file can replace the existing autoupgrade.jar in <19c HOME>/rdbms/admin
5. Add/check oratab entry for 19c rdbms s/w on each node (1 minute)
So we can easily set our environment to point to the 19c home, add an oratab entry for 19c Home
vi /etc/oratabOR
vi /var/opt/oracle/oratab 1960:/u01/app/oracle/product/19.6.0/db_1:N6. Check validity of jar file and java version (1 minute)
Set ORACLE_HOME to new 19C home (note use of ‘<<<’ to direct the ORACLE_SID parameter)
This is important as Java version needed is only in 19c home NOT in 12c home.
. oraenv <<< 1960echo $ORACLE_HOME #19c home
$ORACLE_HOME/jdk/bin/java -jar $ORACLE_HOME/rdbms/admin/autoupgrade.jar -version#Note autoupgrade.jar version, this was tested on build.version 21.1.3
7. Create config file for autoupgrade tool (1 minute)
Create a working directory to hold all our upgrade related files:
mkdir ${ORACLE_BASE}/19C_UPGRADECreate a sub directory with the database name we are upgrading to hold files about that db.
mkdir ${ORACLE_BASE}/19C_UPGRADE/PAUL01cd $ORACLE_BASE/19C_UPGRADEAutoupgrade.jar requires a configuration files so it knows what needs to be upgraded which options to use. The autoupgrade tool can generate an example of this configuration file which then allows us to edit and pick the most suitable option for our upgrade.
$ORACLE_HOME/jdk/bin/java -jar $ORACLE_HOME/rdbms/admin/autoupgrade.jar -create_sample_file configThis should create the sample configuration file /u01/app/oracle/19C_UPGRADE/sample_config.cfg
Copy sample cfg file to edit for the db which we will be upgrading
cp sample_config.cfg <DBNAME>_config.cfgi.e. cp sample_config.cfg PAUL01_config.cfg
Now make a note of details we need for upgrade so we can update the configuration file.
- INSTANE NAME : PAUL01A1
- Source DBHOME : /u01/app/oracle/product/12.1.0.2/db_1
- Target DBHOME : /u01/app/oracle/product/19.6.0/db_1
- Log Dir : /u01/app/oracle/19C_UPGRADE/PAUL01
Choose and edit, relevant entry:
example below, based on a Non CDB upgrade from 12c to 19c
vi PAUL01_config.cfgglobal.autoupg_log_dir=/u01/app/oracle/cfgtoollogs/autoupgrade
#
# Database number 1 - Full DB/CDB upgrade
#
upg1.log_dir=/u01/app/oracle/19C_UPGRADE/PAUL01
upg1.sid=PAUL01A1
upg1.source_home=/u01/app/oracle/product/12.1.0.2/db_1
upg1.target_home=/u01/app/oracle/product/19.6.0/db_1
upg1.start_time=NOW
upg1.run_utlrp=yes
upg1.timezone_upg=yes
# can choose not to migrate to latest TZONE files with ‘no’, which will impact a sql driven downgrade8. Run autoupgrade in analyze mode (5 minutes)
This makes no db changes, runs prechecks, and creates an html and text file with output to review and address before attempting the upgrade.
cd $ORACLE_BASE/19C_UPGRADE. oraenv <<< 1960
echo $ORACLE_HOME # must be 19cUsing the ‘noconsole’ option so we don’t enter an interactive mode.
$ORACLE_HOME/jdk/bin/java -jar ${ORACLE_HOME}/rdbms/admin/autoupgrade.jar \
-config PAUL01_config.cfg -mode analyze -noconsole
output:
AutoUpgrade tool launched with default options
Processing config file ...
+--------------------------------+
| Starting AutoUpgrade execution |
+--------------------------------+
1 databases will be analyzed
Job 100 completed
------------------- Final Summary --------------------
Number of databases            [ 1 ]

Jobs finished                  [1]
Jobs failed                    [0]
Jobs pending                   [0]

Please check the summary report at:
/u01/app/oracle/cfgtoollogs/autoupgrade/cfgtoollogs/upgrade/auto/status/status.html
/u01/app/oracle/cfgtoollogs/autoupgrade/cfgtoollogs/upgrade/auto/status/status.log
The log for prechecks will be in:
/app/oracle/19C_UPGRADE/<db unique name>/upg_logs/<instance name>/[nnn]/prechecks
each run of tool will create a new sub directory so 100 use above, if run again will use 101…..
Find the logs using ‘find’ command below:
find . -name '*preupgrade.log'

find . -name '*preupgrade.html'
review and address any issues from:
status.log and status.html mentioned in output from autoupgrade
<db unique name>_preupgrade.log
<db unique name>_preupgrade.html
9. Backup of Previous settings (5 minutes)
Optionally backup settings and configuration from the current DB version in case we need to crosscheck anything after the upgrade.
#. oraenv <<< <DB BEING UPGRADED> # not 19c home
. oraenv <<< PAUL01A1 echo $ORACLE_HOMEcd /u01/app/oracle/19C_UPGRADE/PAUL01
#cd ${ORACLE_BASE}/19C_UPGRADE/<DBNAME>
cp /var/opt/oracle/oratab .
cp /etc/oratab .
#copy oratab pre upgrade state
cp $ORACLE_HOME/network/admin/*.ora .#copy TNS files
cp $ORACLE_HOME/dbs/*.ora .#copy .ora pfiles
cp $ORACLE_HOME/dbs/orapw* .#copy Password file
sqlplus / as sysdba #Update ORACLE_BASE and DBNAME below before running:
- - create pfile='<ORACLE_BASE>/19C_UPGRADE/<DBNAME>/initora.pre' from spfile;
create pfile='/u01/app/oracle/19C_UPGRADE//PAUL01/initora.pre' from spfile;
select db_unique_name, database_role, cdb from v$database;
alter database backup controlfile to trace;
spool pre_client_jobs.lst
select client_name, status from dba_autotask_client;
spool off
spool pre_directory_objects.lst
set lines 220
col owner for a20
col directory_name for a32
col directory_path for a60
select owner, directory_name, directory_path from dba_directories order by 1;
spool off
@?/rdbms/admin/utlrp
spool invalids_pre.lst
set lines 240
col owner for a32
col object_name for a32
select owner, object_name, object_type from dba_objects where status<>'VALID'
/
set lines 240
col comp_name for a40
select comp_name, version, status from dba_registry order by 1
/
spool off
exit
10. AUD$ clear down (5 minutes)
sqlplus / as sysdbaselect db_unique_name, database_role, cdb from v$database;
select count(*) from sys.aud$; If number is high it may be advisable to house keep these as it can slow down upgrade.
11. Enable Archive log mode (SKIP if db is in archivelog mode) (10 minutes)
Non Production databases may not be in archivelog mode, this is needed so autoupgrade can create a restore point.
sqlplus / as sysdbaselect name, log_mode from v$database;NAME LOG_MODE
--------- ------------
PAUL01 NOARCHIVELOGIf needed
srvctl stop database -d <dbunique name>or
sqlplus / as sysdbashutdown immediate
startup mount--Check FRA paramters are ok
Show parameter db_recovery_file_dest
Show parameter db_recovery_file_dest_size--updated as needed then I.e.
alter system set db_recovery_file_dest='+FRA';
alter system set db_recovery_file_dest_size = 100G;
alter database archivelog;
alter database open;
exit;srvctl start database -d <dbunique name>
#If RAC restart remaining instances12. Ensure you database backups have been running and tested
This is really a last resort, as upgrade should be a tested procedure, hopefully we will have restore points, and if there is a serious issue we can work with Oracle support.
If compatible has not been changed, the potential to use downgrade scripts is also there,
That said it’s always wise to ensure you have tried and tested backup and restore. Additionally before starting the upgrade take a final incremental or archive log backup to secure out restore position if needed, if time permits a full backup.
13. Refresh Dictionary statistics (10 minutes)
It is best practice to have upto date dictionary stats at least 7 days before the upgrade, this can be done with below command, though autoupgrade will automatically perform this if it finds that’s dictionary stats are older than 7 days.
sqlplus / as sysdbaselect db_unique_name, database_role, cdb from v$database;
exec dbms_stats.gather_dictionary_stats(degree=>4)14. Dataguard Step (if using DG, skip if not) (10 Minutes)
Check standby health
take a manual guaranteed restore point on the standby site(s)
change mode to Max Perf (if using Max Availabilty)
stop transport and apply
disable standby site from starting if RAC
# Standby should be in sync and checks return Success
. oraenv <<< <standby instance>dgmgrl /show configuration;
show database '<DB UNIQUENAME>';
validate database '<DB UNIQUENAME>'; -- 12c and later only
exit;# Take a restore point
sqlplus / as sysdbaselect db_unique_name, database_role, cdb from v$database;
recover managed standby database cancel;
create restore point pre_upgrade guarantee flashback database;
recover managed standby database disconnect using current logfile;
exit#Downgrade protection mode to max performance
#Added this as hit an issue with db in max protection mode
dgmgrl /

show configuration;
EDIT CONFIGURATION SET PROTECTION MODE AS MAXPERFORMANCE;

EDIT DATABASE <PRIMARY>  SET PROPERTY 'LogXptMode'='ASYNC';
EDIT DATABASE <STANDBY>  SET PROPERTY 'LogXptMode'='ASYNC';
exit
srvctl stop database -d <STANDBY DB>
srvctl disable database -d <STANDBY DB># Copy DB Broker files from both sites to a backup directory
sqlplus / as sysdbaShow parameter broker— copy these files
# If possible ensure you know commands to recreate dataguard setup in case of any issues,
# where fix is to remove and recreate broker i.e.:
CREATE CONFIGURATION 'SAMMY01' AS PRIMARY DATABASE IS 'SAMMY01A' CONNECT IDENTIFIER IS 'SAMMY01A';
ADD DATABASE 'SAMMY01B' AS CONNECT IDENTIFIER IS 'SAMMY01B';
EDIT DATABASE 'SAMMY01A' SET PROPERTY 'LogXptMode'='SYNC';
EDIT DATABASE 'SAMMY01B' SET PROPERTY 'LogXptMode'='SYNC';
EDIT CONFIGURATION SET PROTECTION MODE AS MAXAVAILABILITY;
ENABLE CONFIGURATION;15. Upgrade Database (downtime 90 minutes)
To upgrade a database we run autoupgrade with the ‘deploy’ option
The upgrade could run for some time, to avoid issues with Unix timeouts use nohup and & also run the upgrade in no console mode.
Note if the upgrade encounters issues, we can look to fix those issues and rerun the same command to perform the upgrade, autoupgrade tracks at which point a failure occurs and restarts the upgrade process from that point, as an example
Previous execution found loading latest data
Total jobs recovered: 1
+--------------------------------+
| Starting AutoUpgrade execution |
+--------------------------------+
autoupgrade will take a Guaranteed Restore Point (when db is in archivelog mode), which can be used as a last resort to backout out upgrade or revert upgrade for a rerun.
cd $ORACLE_BASE/19C_UPGRADE. oraenv <<< 1960# . oraenv <<< <19c Home>, set for java version
echo $ORACLE_HOMEAt this point the Primary database is up and running using its current version, also we have set our environment for 19C
Run upgrade using the configuration file we prepared earlier i.e. <DBNAME>_config.cfg we created earlier.
nohup $ORACLE_HOME/jdk/bin/java -jar ${ORACLE_HOME}/rdbms/admin/autoupgrade.jar \
-config ${ORACLE_BASE}/19C_UPGRADE/<DBNAME>_config.cfg -mode delploy -noconsole &
i.e.
nohup $ORACLE_HOME/jdk/bin/java -jar ${ORACLE_HOME}/rdbms/admin/autoupgrade.jar \
-config PAUL01_config.cfg -mode deploy -noconsole &
#check nohup started ok using :
tail -50 nohup.outconfirm upgrade still running type ‘jobs’
jobs

jobs [1]+ Running nohup $ORACLE_HOME/jdk/bin/java -jar ${ORACLE_HOME}/rdbms/admin/autoupgrade.jar -config autoupgrade_PAUL01.cfg -mode deploy -noconsole &
After upgrade complete we should see: but look at next step for logs to view while and after upgrade is run.
Allow 60 to 120 minutes for upgrade.
+--------------------------------+
| Starting AutoUpgrade execution |
+--------------------------------+
Job 101 completed
------------------- Final Summary --------------------
Number of databases            [ 1 ]

Jobs finished                  [1]
Jobs failed                    [0]
Jobs pending                   [0]

---- Drop GRP at your convenience once you consider it is no longer needed ----
Drop GRP from PAUL01A1: drop restore point AUTOUPGRADE_9212_PAUL01A121020

Please check the summary report at: /u01/app/oracle/cfgtoollogs/autoupgrade/cfgtoollogs/upgrade/auto/status/status.html/u01/app/oracle/cfgtoollogs/autoupgrade/cfgtoollogs/upgrade/auto/status/status.logSee next step for logs to monitor while upgrade runs.
If we do need to raise an Oracle Ticket for help use below command to zip up all logs files:
$ORACLE_HOME/jdk/bin/java -jar ${ORACLE_HOME}/rdbms/admin/autoupgrade.jar -config <config file> -zip Also add the db alerts logs manually to SR.
16. Logs to check while upgrade is running
Status Logs
/u01/app/oracle/cfgtoollogs/autoupgrade/cfgtoollogs/upgrade/auto/status/status.html

/u01/app/oracle/cfgtoollogs/autoupgrade/cfgtoollogs/upgrade/auto/status/status.log
# each stage should have ‘[Status] SUCCESS’
precheck log
tail -100 /u01/app/oracle/cfgtoollogs/autoupgrade/cfgtoollogs/upgrade/auto/autoupgrade.log# expect Jobs finished [1] i.e. not failed
main upgrade log located in
${ORACLE_BASE}/19C_UPGRADE/<DB NAME>/<INSTANCE NAME>/<instance name>/[nnn]/dbupgrade#nnn, 101 or which ever number run your are on each run will increment number,
Example would be:
/u01/app/oracle/19C_UPGRADE/PAUL01/PAUL01A1/101/dbupgrade/u01/app/oracle/19C_UPGRADE/PAUL01/PAUL01A1/101/dbupgrade
For output generated by scripts: catupgrd*.lst
For error files, if any :catupgrd*.err
grep ^ORA- *.log
grep ^ORA- *.lst
cat catupgrd*.err
cat upg_summary_report.log
cat upg_summary.logcheck db alertlog for any ORA- errors
$ORACLE_BASE/diag/rdbms/<lower unique name>/<UPPER INSTANCE NAME>/trace /alert_<INSTANCE_NAME>log17. TNS, Parameter File, Password File check (10 minutes)
Check this on all nodes in RAC configuration.
AutoUpgrade copies or merges the source Oracle home configuration files (tnsnames.ora, sqlnet.ora, and other files) to the target Oracle home. We should just check we are ok with the updates made
TNSfiles normally located in
${ORACLE_HOME}/network/admin Listener.ora:
If there are any static entries with OLD oracle home in the listener.ora, backup listener.ora, then update to reflect new Oracle HOME, and bounce listener.
Read Only Oracle Homes
Small note here that Oracle Read Only homes will store configuration files such as pfile, tns files, password files under ORACLE_BASE/home, rather than within the ORACLE_HOME, be aware of this when doing checks.
The orabasetab file resides in ORACLE_HOME/install/orabasetab. To determine if an ORACLE_HOME is read-only or read/write, you can check for the presence of the orabasetab file.
ASM
Small note on ASM , this can be used to store password as well as usual to store spfile here, though some may still store password file on f/s under $ORACLE_HOME/dbs.
18. spfile and password files (10 minutes)
# Reset Env, autoupgrade should have updated oratab
. oraenv <<< <DB BEING UPGRADED>echo $ORACLE_HOME # this should be the new 19c homesqlplus / as sysdba-- check spfile in use
Show parameter spfile
-- check cluster_database is true for RAC
Show parameter cluster_database
-- check password file still in use, autoupdate should move these
select inst_id, username from gv$pwfile_users;
Check if spfile is use in CRS if applicable:
srvctl config database -d <db uniquename>|grep -i spfilesrvctl config database -d PAUL01A |grep -i spfileSpfile: +DATA/PAUL01A/PARAMETERFILE/spfile.398.1078104213
Notice spfile location has changed but is not an issue, but lets update our init.ora files for same:
echo “+DATA/PAUL01A/PARAMETERFILE/spfile.398.1078104213” > $ORACLE_HOME/dbs/initPAUL01A1.ora scp $ORACLE_HOME/dbs/initPAUL01A1.ora rac02-a:$ORACLE_HOME/dbs/initPAUL01A2.ora 19. Update Primary Site node 2 (5 minutes)
ssh <node2>
update /var/opt/oracle/oratab or /etc/oratab, crs/autoupgrade may auto update this already
<db upgraded>:<New 19c home>:N
i.e.
PAUL01A2:/u01/app/oracle/product/19.6.0/db_1:N
20. CRS update/check on Primary
#optional if any home specific settings in place, i.e. tnsnames
srvctl setenv database -d PAUL01A -t TNS_ADMIN=/u01/app/oracle/product/19.6.0/db_1/network/admin*Noticed autoupgrade may now down do this in log
INFO Setting srvctl environmental variable [TNS_ADMIN] from [/u01/app/oracle/product/12.1.0.2/db_1/network/admin] to [/u01/app/oracle/product/19.6.0/db_1/network/admin]
#review settings
srvctl config database -d PAUL01A21. Post checks upgrade checks (5 minutes)
Check both instances are running post upgrade
echo $ORACLE_HOME
echo $ORACLE_SID
srvctl status database -d <dbunique name>check timezone: if TZ upgrade worked expect both below to return 32
sqlplus / as sysdbaSELECT * FROM v$timezone_file;
SELECT DBMS_DST.get_latest_timezone_version from dual;
exitCheck database invalids
sqlplus / as sysdba select name from v$database;
select count(*) , status from dba_objects group by status;
select owner, object_name, object_type from dba_objects where status<>'VALID' and owner in ('SYS','SYSTEM');
set lines 240
col comp_name for a40
select comp_name, version, status from dba_registry order by 1;
exitRun post status tool
sqlplus / as sysdba @?/rdbms/admin/utlusts.sql TEXT Oracle Database Release 19 Post-Upgrade Status Tool 07-20-2021 12:24:3
Database Name: PAUL01
Component Current Full Elapsed Time
Name Status Version HH:MM:SS
Oracle Server VALID 19.6.0.0.0 00:24:07
JServer JAVA Virtual Machine VALID 19.6.0.0.0 00:09:32
Oracle XDK VALID 19.6.0.0.0 00:03:18
Oracle Database Java Packages VALID 19.6.0.0.0 00:00:36
Oracle Workspace Manager VALID 19.6.0.0.0 00:01:32
Oracle Real Application Clusters VALID 19.6.0.0.0 00:00:00
Oracle XML Database VALID 19.6.0.0.0 00:03:56
Datapatch 00:04:15
Final Actions 00:05:55
Post Upgrade 00:01:17
Post Compile 00:06:30
Total Upgrade Time: 00:59:07
Database time zone version is 32. It meets current release needs.Check autojobs were as before and amend if needed
sqlplus / as sysdbaselect client_name, status from dba_autotask_client;
--EXEC DBMS_AUTO_TASK_ADMIN.DISABLE('AUTO SPACE ADVISOR',NULL,NULL);
--EXEC DBMS_AUTO_TASK_ADMIN.DISABLE('SQL TUNING ADVISOR',NULL,NULL);
--EXEC DBMS_AUTO_TASK_ADMIN.DISABLE('AUTO OPTIMIZER STATS COLLECTION',NULL,NULL);
Exit;check directory objects look same as before from pre_directory_objects.lst
sqlplus / as sysdbaspool post_directory_objects.lst
set lines 220
col owner for a20
col directory_name for a32
col directory_path for a60
select owner, directory_name, directory_path from dba_directories order by 1;
spool off
exit22. Application changes
If there are any application vendor specific changes/setting these should be made.
23. Compatible
DO NOT UPDATE the compatible parameter yet though, as once that is changed we lose the option to back out the upgrade, this should only be changed once all teams are happy upgrade is ok it’s usual to leave this on the old setting for 7 to 14 days.
Also note there are restore points present on the db to allow a backout using flashback database.
24. Review Database, ASM, CRS logs
db alert logs on both nodes for any errors
${ORACLE_BASE}/diag/rdbms/<lower db uniquename/<upper db instancename>/trace/alert_<INSTANCENAME>.logasm alert logs on both nodes for any errors
${ORACLE_BASE_GRID}/diag/asm/+asm/<ASM InstanceName>/trace/alert_<ASM InstanceName>.logcrs logs on both ndoes for any errors
${ORACLE_BASE_GRID}/diag/crs/<short hostname>/crs/trace/alert.log25. Update Standby Sites (Skip if not using Standby)
On the Primary node:
Copy the password files to standby site if using Dataguard(amend for RO home)
scp $ORACLE_HOME/dbs/orapwPAUL01A1 rac01-b:$ORACLE_HOME/dbs/orapwPAUL01B1
scp $ORACLE_HOME/dbs/orapwPAUL01A1 rac02-b:$ORACLE_HOME/dbs/orapwPAUL01B2
Listener.ora
If there are any static entries with OLD oracle home in the listener.ora, update these to reflect new Oracle HOME, and bounce listener.
On the Standby Site:
Update tnsnames details on Standby Nodes:
PAUL01A = (DESCRIPTION = (ADDRESS_LIST = (ADDRESS = (PROTOCOL = TCP)(HOST = rac-A-scan)(PORT = 1521))) (CONNECT_DATA = (SERVICE_NAME = PAUL01A)))
PAUL01B = (DESCRIPTION = (ADDRESS_LIST = (ADDRESS = (PROTOCOL = TCP)(HOST = rac-B-scan)(PORT = 1521))) (CONNECT_DATA = (SERVICE_NAME = PAUL01B)))
Listener.ora
If there are any static entries with OLD oracle home in the listener.ora, update these to reflect new Oracle HOME, and bounce listener.
Update oratab entry on Standby nodes to reflect new Oracle Home
On rac01-B: PAUL01B1:/u01/app/oracle/product/19.6.0/db_1:N
On rac02-B: PAUL01B2:/u01/app/oracle/product/19.6.0/db_1:N
Update ORACLE HOME in crs to reflect new 19c home
. oraenv <<< PAUL01B1echo ${ORACLE_HOME} # should be 19c home now as we updated oratabsrvctl upgrade database -db PAUL01B -oraclehome $ORACLE_HOME
srvctl setenv database -d PAUL01B -t TNS_ADMIN=/u01/app/oracle/product/19.6.0/db_1/network/admin#optional if any home specific settings in place, i.e. tnsnames
srvctl config database -d PAUL01B # review outputEnable DB in CRS and start it
srvctl enable database -d PAUL01B
srvctl start database -d PAUL01B
# check db’s are reachable
tnsping PAUL01A
tnsping PAUL01B
Enable apply and transport
wait 2 minutes for broker process to start
dgmgrl /edit database 'PAUL01A' set state='TRANSPORT-ON';
edit database 'PAUL01B' set state='APPLY-ON';wait for DG to catch up and be error free monitor catch up using ‘show database’, until no lag:
show database 'PAUL01B'; Database Warning(s):
ORA-16853: apply lag has exceeded specified threshold
ORA-16855: transport lag has exceeded specified thresholdEventually should reach an error free state:
show database 'PAUL01B';Role: PHYSICAL STANDBY
Intended State: APPLY-ON
Transport Lag: 42 seconds (computed 2 seconds ago)
Apply Lag: 1 hour(s) 15 minutes 21 seconds (computed 2 seconds ago)
Average Apply Rate: 9.49 MByte/sshow database 'PAUL01B';Role: PHYSICAL STANDBY
Intended State: APPLY-ON
Transport Lag: 0 seconds (computed 1 second ago)
Apply Lag: 0 seconds (computed 1 second ago)
…
Database Status:
SUCCESSChange protection mode if needed
dgmgrl /EDIT DATABASE 'PAUL01A' SET PROPERTY 'LogXptMode'='SYNC';
EDIT DATABASE 'PAUL01B' SET PROPERTY 'LogXptMode'='SYNC';EDIT CONFIGURATION SET PROTECTION MODE AS MAXAVAILABILITY;If any spfile change were made on the Primary, ensure these are present on the standby
Health checks
dgmgrl /show configuration;
show database '<DB UNIQUENAME>';
validate database '<DB UNIQUENAME>';Switchover test and switch back (connect as sys for this)
dgmgrlconnect sys/<password> show configuration;
validate database 'PAUL01B'
-- Ready for Switchover: Yesswitchover to 'PAUL01B';
-- wait to complete, review output is error free, could take several minutesPerforming switchover NOW, please wait...
New primary database "PAUL01B" is opening...
Oracle Clusterware is restarting database "PAUL01A" ...
Connected to "PAUL01A"
Connected to "PAUL01A"
..
# repeats output many times while its progressing
..
Connected to "PAUL01A"
Connected to "PAUL01A"
Switchover succeeded, new primary is "PAUL01B"show configuration
validate database 'PAUL01A'
-- Ready for Switchover: Yesswitchover to 'PAUL01A';
-- wait to complete, review output is error free Review logs:
db alert logs on both nodes for any errors
${ORACLE_BASE}/diag/rdbms/<lower db uniquename/<upper db instancename>/trace/alert_<INSTANCENAME>.log
asm alert logs on both nodes for any errors
${ORACLE_BASE_GRID}/diag/asm/+asm/<ASM InstanceName>/trace/alert_<ASM InstanceName>.log
crs logs on both ndoes for any errors
${ORACLE_BASE_GRID}/diag/crs/<short hostname>/crs/trace/alert.log
dg logs on all nodes for any errors
${ORACLE_BASE}/diag/rdbms/<lower db uniquename/<upper db instancename>/trace/drc<INSTANCENAME>.log
26. Drop Restore points after application checkouts and sign off
Warning after we drop restore points rollback is complicated
sqlplus / as sysdbaset lines 240
col name for a45
select instance_name, version from gv$instance;
select name, scn, time from v$restore_point;drop restore point <restore point name>;
exit27. Change Compatible only once sure no going back
*WARNING this change cannot be backed out the compatible parameter can only be increased not reverted, To revert change would require a full db restore so procedure and impact must be tested in advance.
If not a dataguard setup skip to update for Primary DB.
Check Dataguard in sync
. oraenv <<< <INSTANCE NAME>dgmrgl /show configuration;
show database <standby>;
Validate database <standby>;
1) Increase the value of the COMPATIBLE initialization parameter on all standby databases in the configuration first, as follows:
1a)
– Ensure that apply is current on the standby database(s).
dgmgrl /show configuration;
show database '<DBUNIQUE NAME>
-- look for 'Intended State: APPLY-ON'
exit;1b) On one instance of each standby database, execute the following SQL statement:
sqlplus / as sysdbaselect version from v$instance;
-- must be 19.0.0 if not wrong db!
select db_unique_name, database_role from v$database;
-- must be PHYSICAL STANDBY
show parameter compatible;
ALTER SYSTEM SET COMPATIBLE='19.0.0' SCOPE=SPFILE;
exit;1c) If Redo Apply or SQL Apply is running, then stop them.
dgmgrl /show configuration;
edit database '<DBUNIQUE NAME>' set state='APPLY-OFF';
show database '<DBUNIQUE NAME>;
-- look for 'Intended State: APPLY-OFF'
exit;1d) Restart all instances of the standby database(s).
srvctl status database -d <DBUNIQUE NAME>srvctl stop database -d <DBUNIQUE NAME>
srvctl status database -d <DBUNIQUE NAME>
srvctl start database -d <DBUNIQUE NAME>
srvctl status database -d <DBUNIQUE NAME>
1e) check compatible now is 19.0.0
sqlplus / as sysdbaselect db_unique_name, database_role from v$database;
show parameter compatible;
exit;1f) If you previously stopped Redo Apply or SQL Apply, then restart them.
dgmgrl /show configuration;
edit database '<DBUNIQUE NAME>' set state='APPLY-ON';-- wait 2 minutes
show configuration;
show database '<DBUNIQUE NAME>;
exit;<Start here for non Dataguard>
2) Increase the value of the COMPATIBLE initialization parameter on the primary database, as follows:
. oraenv -> <DBNAME>2a) check nothing running on database as it will be bounced
sqlplus / as sysdbaset lines 132
col username for a32
select db_unique_name, database_role from v$database;
select username, count(*) from gv$session group by username order by username;
exit;2b) On one instance of the primary database, execute the following SQL statement:
sqlplus / as sysdbaselect version from v$instance;
-- must be 19.0.0 if not wrong db!
select db_unique_name, database_role from v$database;
-- MUST BE PRIMARYALTER SYSTEM SET COMPATIBLE='19.0.0' SCOPE=SPFILE;
exit;2c) Restart all instances of the primary database.
srvctl status database -d <DBUNIQUE NAME>srvctl stop database -d <DBUNIQUE NAME>
srvctl status database -d <DBUNIQUE NAME>srvctl start database -d <DBUNIQUE NAME>
srvctl status database -d <DBUNIQUE NAME>2d) check compatible now is 19.0.0
sqlplus / as sysdbaselect db_unique_name, database_role from v$database;
show parameter compatible;
exit;3) check db logs and DG in sync
3a)Review alert logs of all instance on both Primary and Standby
3b) Check dataguard in sync
# wait 2 minutes
dgmgrl /
show configuration;
show database '<DBUNIQUE NAME>;
exit28. If test DB take db out of archivelog mode
If this was a non production database, which we temporarily place in archivelog mode for the upgrade, we should revert that change now.
srvctl stop database -d <db uniquename>sqlplus / as sysdbastartup mount
alter database noarchivelog
shutdown immediate
exitsrvctl start database -d <db uniquename>If amended any FRA parameter to allow space for flashback/archive logs change them back.
Clear down any archive logs for non production database that may have been generated
Rman target /Delete archivelog all;
Exit;29. Upgrade rman catalog and backup considerations
Before upgrading to 19c ensure any third part backup vendor’s support 19c, some may need their s/w upgraded to remain in support.
Once a database is upgraded, connect to the catalog database using the 19c and upgrade catalog as below, as below you need to run the ‘upgrade catalog command twice’, if you share a calog amongst many databases please check compatibility in advance.
rmanconnect catalog user/password@<RMANDB>upgrade catalog
upgrade catalog30. Fixed Table statistics
Optional step, the default stats job should cater for this as well unless disabled
From the documentation:
Because of the transient nature of X$ tables, you must gather fixed objects statistics when there is a representative workload on the system. If you cannot gather fixed objects statistics during peak load, then Oracle recommends that you do it after the system is in a runtime state, and the most important types of fixed object tables are populated.
To gather statistics for fixed objects, run the following PL/SQL procedure:
execute dbms_stats.gather_fixed_objects_stats;31. OEM and MONITORING Considerations
Targets in OEM may still reference the old Oracle Home, the database that has been upgraded so be checked and Oracle Home updated in configuration to new 19c Home
32. Oracle Client
When upgrading a database we should review if Oracle Clients should also be upgraded, of if not upgrading clients if existing clients are compatible and supported on 19c.
Review: Client / Server Interoperability Support Matrix for Different Oracle Versions (Doc ID 207303.1)
33. Backout considerations
If there are issues with the upgrade, I would advise raising an Oracle Ticket to see if a workaround is available.
If there is no workaround or we need to get system back to the previous state, there are a few options depending on how early the issue is spotted.
I would recommend testing all the backout options if possible in advance.
Also note there may be patches that are needed on the Old Oracle Home to allow a downgrade (see Doc ID 2539751.1) as well as Timezone patches to deploy to old home.
As long as the compatible parameter has not been increased we can use below, but note this is a point in time restore back to pre-upgrade timestamp of db, so data may have changed since then, and revert db will lose these changes:
- Flashback database to restore point taken by autoupgrade.
- Manual flashback to guaranteed restore point using SQL
- autoupgrade -restore command
- If there are nolonger a restore points as this has been dropped or was never taken then only option is downgrade scripts, but note this will not lose any app data change since the db upgrade
- If Timezone was updated we need to patch old s/w with the same timezone files
- Run dbdowngrade utility (this runs catdwgrd and catcon.pl)
If Parameter value for compatible has been increased, the only way to revert db would be
- Full RMAN/DB restore, where we lose any changes as it a point it time restore to before upgrade
- We could recreate db and datapump data from 19c db back to the previous version, then no loss in app data change
- Note timezones need to match between 12c and 19c home